Statistics reveal a growing trend among homeowners to enhance their outdoor living spaces. Studies show that outdoor kitchens, seating areas, and pergolas top the list of desired outdoor features, with 83% of homebuyers considering them essential or desirable. This increasing demand underscores the importance of finding the right roofing option for your pergola to create a functional and inviting outdoor sanctuary.
Have you been wondering: “how to put a roof on my pergola”?Discover how to put a roof on your pergola in our comprehensive guide. We’ll walk you through the process of adding a roof to your pergola with step-by-step instructions. Explore a range of roofing options, including wood, shingles, polycarbonate panels, and retractable fabric canopies, ensuring a sturdy and appealing result for your outdoor space.
From creating a cool and shaded retreat to providing protection from rain and UV rays, a roofed pergola opens up a world of possibilities for outdoor enjoyment. Let your imagination soar as we embark on this journey, empowering you to elevate your pergola to new heights of comfort, style, and functionality. Let the adventure begin!
Key Takeaways
- Assess the structure and stability of the pergola before adding a roof
- Choose the right roofing material based on preferences, budget, and climate conditions
- Install a waterproof membrane or underlayment for added protection against moisture
- Regularly inspect and maintain the pergola roof for optimal condition and longevity
Assess Your Pergola’s Structure and Stability
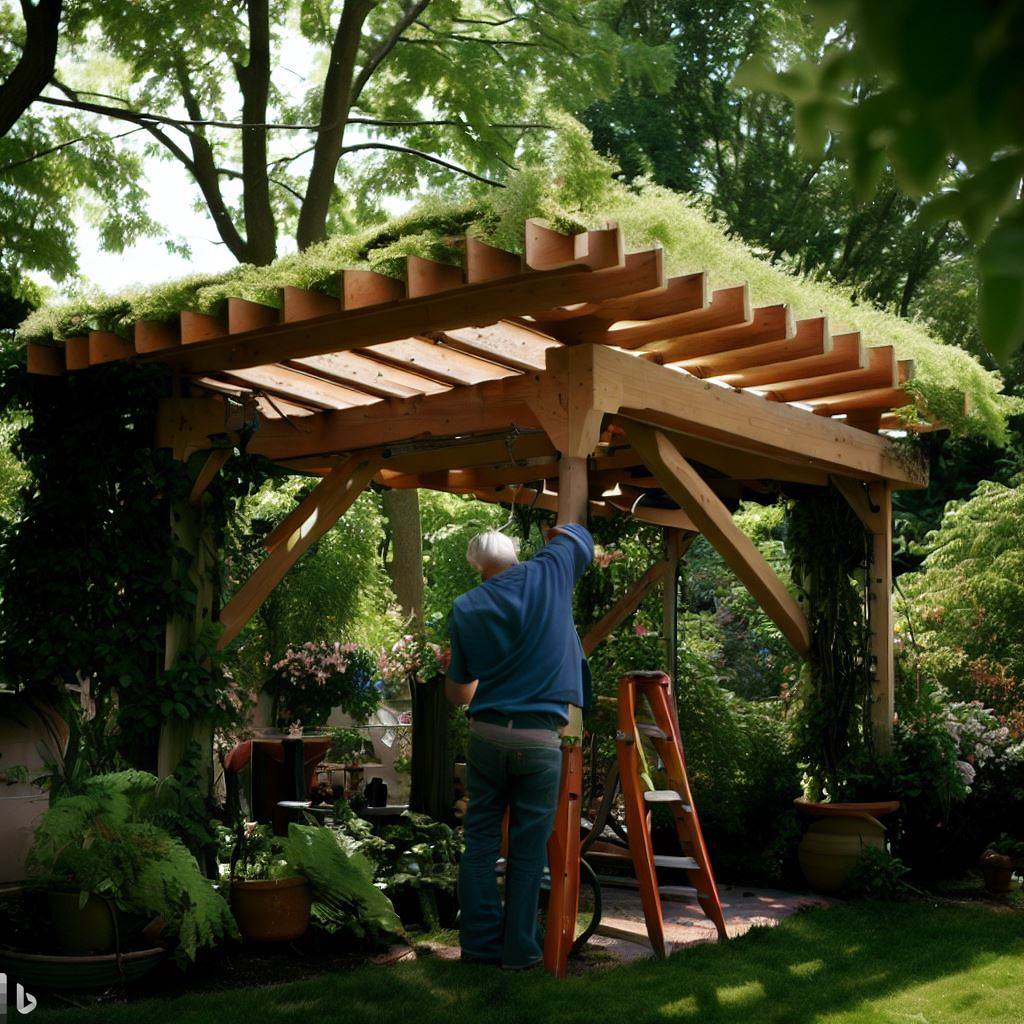
First things first! You’ll need to take a close look at your pergola’s structure and make sure it’s sturdy enough to support the weight of a roof. Inspect the beams, posts, and overall framework for any signs of damage or weakness. Check if all connections are secure and there are no loose or wobbly parts.
If you notice any issues, reinforce or repair them before proceeding with the roofing installation. A strong foundation is crucial to ensure the safety and durability of your roofed pergola.
Once you’ve assessed your pergola’s structure and ensured its stability, it’s time to choose the right roofing material. There are various options available depending on your preferences, budget, and climate conditions.
From traditional shingles to metal panels or even thatch, each type has its own advantages and considerations. Consider factors such as aesthetics, maintenance requirements, insulation properties, and longevity when making your decision.
Choose the Right Roofing Material
When choosing the right roofing material for your pergola, there are several key points to consider:
- Consider Different Types of Roofing Materials
To make your pergola truly stunning, you should explore the wide range of roofing materials available to create a breathtaking outdoor oasis. There are several types of roofing materials that can enhance the beauty and functionality of your pergola.
One popular option is polycarbonate roofing, which provides excellent UV protection and durability. Another choice is metal roofing, which offers a sleek and modern look while being resistant to fire and extreme weather conditions.
Additionally, you can consider thatch roofing for a natural and tropical feel or even glass panels for an elegant touch. Each material has its own unique characteristics and benefits, so take some time to evaluate durability and weather resistance when making your decision.
By considering these options, you can find the perfect roof for your pergola that will stand up to the elements while creating an inviting space for relaxation and enjoyment.
- Evaluate Durability and Weather Resistance
When evaluating durability and weather resistance, consider materials such as metal, polycarbonate, or asphalt shingles. Metal roofs are known for their strength and ability to withstand harsh weather conditions.
Polycarbonate panels offer excellent durability while allowing natural light to filter through. Asphalt shingles are also popular due to their affordability, wide range of colors, and resistance to wind and rain; more on that in a bit.
To ensure maximum durability, look for roofing materials with high UV resistance and impact resistance ratings. Additionally, consider the climate in your area when choosing a roofing material. If you live in an area prone to heavy rains or strong winds, opt for materials specifically designed to withstand these weather conditions.
Next, compare cost and aesthetics by exploring different roofing options available within your budget range.
- Compare Cost and Aesthetics
Consider exploring different roofing options and their costs to find the perfect fit for your pergola, creating a stunning and affordable outdoor oasis that will leave you in awe. When comparing cost, keep in mind that different materials have varying price points.
Asphalt shingles are a popular and budget-friendly choice, while metal roofing offers durability and longevity at a higher price. For those seeking an eco-friendly option, consider polycarbonate panels or thatch roofing for a natural look.
In terms of aesthetics, asphalt shingles come in various colors to match your existing outdoor décor, while metal roofing provides a sleek and modern appearance. It’s important to weigh both cost and aesthetics when making your decision.
With the right roofing choice, you can transform your pergola into a stylish retreat that blends seamlessly with your outdoor space. Now let’s move on to preparing your pergola for roof installation by ensuring it is structurally sound.
Prepare Your Pergola for Roof Installation
Before you can begin installing the roof, it is important to prepare your pergola properly. Here are a few things you can do:
- Start by inspecting the structure for any damage or weak spots. Ensure that all screws and joints are secure and tighten them if necessary.
- Clean the surface of your pergola by removing any debris or dirt that may interfere with the installation process.
- Next, measure and mark where the roof panels will be installed on your pergola. This will help you visualize how the finished product will look and ensure accurate installation.
- If needed, reinforce any areas that may require additional support for the weight of the roofing material.
Now that your pergola is prepped and ready, it’s time to move on to installing a waterproof membrane or underlayment. This crucial step will provide an extra layer of protection against moisture and ensure a longer lifespan for your new roof.
Install a Waterproof Membrane or Underlayment
Now that your pergola is prepped and ready, let’s dive into installing a waterproof membrane or underlayment to ensure maximum protection against moisture and extend the lifespan of your new roof. Here’s what you need to do:
- Measure: Start by measuring the area of your pergola’s roof to determine how much membrane or underlayment material you’ll need.
- Clean and Dry: Make sure the surface is clean and dry before applying the membrane or underlayment. Remove any debris or dirt that could affect adhesion.
- Apply Adhesive: Use a suitable adhesive recommended by the manufacturer to attach the membrane or underlayment to the roof surface. Follow their instructions carefully for optimal results.
- Smooth Out: Once applied, smooth out any air bubbles or wrinkles in the membrane or underlayment using a roller or squeegee.
With the waterproof membrane or underlayment securely in place, you’re now ready to install the roofing material and complete your pergola’s transformation into a fully protected outdoor space.
Install the Roofing Material
Step-by-Step Instructions for Installing Shingles/Metal Panels/Polycarbonate Sheets
When installing shingles, metal panels, or polycarbonate sheets on your pergola, make sure to carefully follow the step-by-step instructions to ensure a secure and durable roof.
- Begin by preparing the surface of your pergola for installation. Remove any debris and ensure that it is clean and dry.
- Next, lay down a layer of underlayment to provide an additional barrier against water infiltration. For shingles, start at the bottom edge and work your way up, overlapping each row as you go.
- Use roofing nails to secure them in place according to manufacturer’s recommendations. Metal panels can be attached using screws or nails inserted through pre-drilled holes along the edges. Polycarbonate sheets can be installed using screws with rubber washers for added waterproofing.
Once installed, your roofing material will provide protection from the elements while enhancing the aesthetic appeal of your pergola.
Trim and Finish the Edges
Now that you have secured the roofing material with nails or screws, it’s time to trim and finish the edges of your pergola roof. This step is crucial for achieving a polished and professional look.
Start by measuring and cutting the trim pieces to fit along the outer edges of your roof. Use a saw or a miter box to ensure clean and precise cuts. Once you have all the trim pieces ready, attach them to the edges of your roof using nails or screws, making sure they are flush with both the roofing material and the supporting structure.
After securing the trim, take some time to inspect for any gaps or unevenness. Fill in any gaps with caulk or sealant, and sand down any rough spots for a smooth finish. With this step complete, you’re now ready to move on to adding additional features for enhanced protection against weather elements without compromising style.
Add Additional Features for Enhanced Protection
To enhance the protection of your pergola, there are two additional features you should consider adding:
- Install Gutters for Rainwater Drainage
One important step in completing your pergola roof is ensuring proper rainwater drainage by installing gutters. Gutters play a crucial role in directing rainwater away from your pergola and preventing any potential damage caused by water pooling or overflowing.
To install gutters:
- Start by measuring the length of each side of your pergola and purchase gutter components accordingly.
- Attach the gutter brackets to the fascia boards and secure them using screws.
- Connect the gutter sections together using sealant and attach end caps to ensure a watertight seal.
- Install downspouts at appropriate locations to direct water away from your pergola’s foundation.
By properly installing gutters, you can protect your pergola from water damage while also maintaining a clean and dry outdoor space during rainy weather.
- Consider Adding Shade Screens or Curtains
Consider enhancing your pergola’s functionality and aesthetic appeal by incorporating shade screens or curtains. These additions will provide an extra layer of protection against the sun’s rays, allowing you to enjoy the outdoors in style.
Shade screens are a popular choice as they can be easily installed and offer adjustable coverage, giving you control over the amount of shade desired. Curtains, on the other hand, add a touch of elegance and privacy to your pergola while still providing protection from the sun.
Whether you choose screens or curtains, both options are designed to keep you comfortable and cool during hot summer days. In addition to their practical benefits, these additions also add a decorative element to your outdoor space.
Once you have added shade screens or curtains to your pergola, it is important to regularly inspect and maintain them for optimal performance. Now let’s take a look at regular maintenance and inspection for your newly enhanced pergola…
Regular Maintenance and Inspection
Ensure you regularly inspect and maintain your pergola roof to prolong its lifespan and keep it in optimal condition. Regular maintenance will help prevent any potential issues and ensure that your roof is in good shape year-round.
Start by checking for any signs of damage, such as loose or missing shingles, cracks, or leaks. Repair or replace any damaged parts promptly to avoid further deterioration. Additionally, clean your roof regularly to remove debris, dirt, and moss that can accumulate over time. You can also use a soft brush or broom to gently sweep away any loose materials. Finally, inspect the gutters and downspouts for clogs or blockages and clear them out if necessary.
By taking the time to properly maintain your pergola roof, you can enjoy years of use with minimal problems and maximize its longevity. Now that you have learned about regular maintenance and inspection for your pergola roof, it’s time to enjoy your newly roofed pergola!
Enjoy Your Newly Roofed Pergola!
Now that you’ve transformed your pergola with a brand new roof, get ready to bask in the shade and enjoy endless outdoor relaxation! Here are some tips to help you make the most of your newly roofed pergola:
- Set up comfortable seating: Arrange cozy chairs or a hammock for ultimate relaxation. Add some cushions and throw pillows for extra comfort.
- Create a cozy atmosphere: Hang string lights or lanterns to create a warm and inviting ambiance. Consider adding curtains or blinds to provide privacy and shade when needed.
- Personalize your space: Add potted plants, artwork, or decorative elements that reflect your style and personality. This will make your pergola feel like an extension of your home.
- Entertainment options: Install speakers for music or set up an outdoor projector for movie nights under the stars.
With these ideas in mind, go ahead and enjoy the freedom of having a beautifully roofed pergola where you can unwind and create lasting memories with family and friends.
Conclusion
Now that you have successfully completed the installation of a roof on your pergola, you can confidently enjoy the benefits it offers. By assessing the structure and stability of your pergola, choosing the right roofing material, and following the necessary installation steps, you have enhanced its functionality and durability.
Remember to regularly maintain and inspect your newly roofed pergola to ensure its longevity. With proper care, you can now take pleasure in outdoor activities under the protection of your beautifully covered pergola.
FAQs On How To Put A Roof On My Pergola
Q: How can I put a roof on my pergola?
A: Putting a roof on your pergola can be a great way to add functionality and style to your outdoor space. There are several options you can consider, such as installing roof panels or using fabric roof covers. Read on to explore the different roofing options and installation steps.
Q: What are the benefits of putting a roof on my pergola?
A: Adding a roof to your pergola offers numerous benefits. It provides shade and protection from the sun, allowing you to enjoy your backyard even on hot days. A roof can also offer shelter from rain, so you can still enjoy your outdoor space even during light showers. Not to mention, a roof on your pergola adds a touch of elegance and sophistication to your patio or garden.
Q: How much does it cost to put a roof on a pergola?
A: The cost of putting a roof on your pergola can vary depending on the type of roof you choose and the size of your pergola. Installing a solid roof, like a fabric or metal panel, may be more expensive than using a simple shade cloth. It is best to research different roofing options and consult with professionals to get an accurate estimate for your specific project.
Q: What types of roofs should I consider for my pergola?
A: There are many types of roofs to consider for your pergola. Some popular options include solid roofs made of fabric or metal panels, as well as more innovative designs like retractable roofs. The type of roof you choose will depend on your personal preferences, budget, and the overall look you want to achieve for your outdoor space.
Q: How do I install a roof on my pergola?
A: Installing a roof on your pergola can be a DIY project if you’re handy and have the necessary tools. Begin by measuring the size of your pergola and selecting the appropriate roof panels or materials. Follow the manufacturer’s instructions for installation, which usually involve drilling and securing the panels to the top of your pergola. If you’re unsure about the process, it’s always a good idea to consult with a professional for assistance.
Q: Will a roof on my pergola keep all the light out?
A: Adding a roof to your pergola does provide shade and protection, but it won’t completely block out all the light. A solid roof, like a fabric or metal panel, will reduce the amount of direct sunlight that filters through, creating a comfortable and shaded space. However, you can still enjoy a balanced amount of natural light, as a roof usually has openings or vents that allow some light to come through.
Q: Do I need to worry about rain if I put a roof on my pergola?
A: If you have a solid roof on your pergola, like a fabric or metal panel, you won’t have to worry about light rain. The roof will provide protection and keep you dry while you’re enjoying your outdoor space. However, it is important to note that during heavy rain or storms, water may still find its way through the openings or gaps in the roof. It’s always a good idea to take necessary precautions and consider waterproofing options if you live in an area with frequent heavy rainfall.
Q: Can I put a roof on my flat pergola?
A: Yes, you can put a roof on your flat pergola. In fact, adding a roof to a flat pergola can enhance its aesthetics and functionality. A flat roof design is a popular choice for modern pergolas, as it creates a sleek and contemporary look. You can opt for a solid roof made of fabric or metal panels, or explore other unique designs that suit your personal style.
Q: What are some creative pergola roof cover ideas?
A: If you’re looking to get creative with your pergola roof, there are several ideas you can consider. Some popular options include using bamboo or thatched roof covers to create a tropical vibe, or installing polycarbonate panels for a modern and sleek look. You can also explore options like pergola curtains or retractable shade systems, which offer versatility and allow you to adjust the amount of sunlight and shade.
Q: Can I install a roof on my pergola myself?
A: Installing a roof on your pergola can be a DIY project if you have the necessary tools and skills. However, it’s important to note that the installation process may require some technical expertise, especially if you’re working with materials like metal panels. If you’re unsure about the process or want to ensure a professional finish, it’s always a good idea to consult with a contractor or experienced handyman.